1. Viewing in graphics - Introduction
Have you ever wondered, "When you specify 3D-coordinates to render something on your screen, how is it exactly presented on your 2D-screen?". This is the place where you'll get the answers to your question and in details. Given the vertices of a 3D model in a 3D-space, you perform some matrix-based transformations on those vertices, which gives you the exact integer coordinates to te pixel you want to place those vertices... This is a really crude explaination but, good to get started with. Take a look at Fig-1.1 to get a jist of the transformations that are applied.
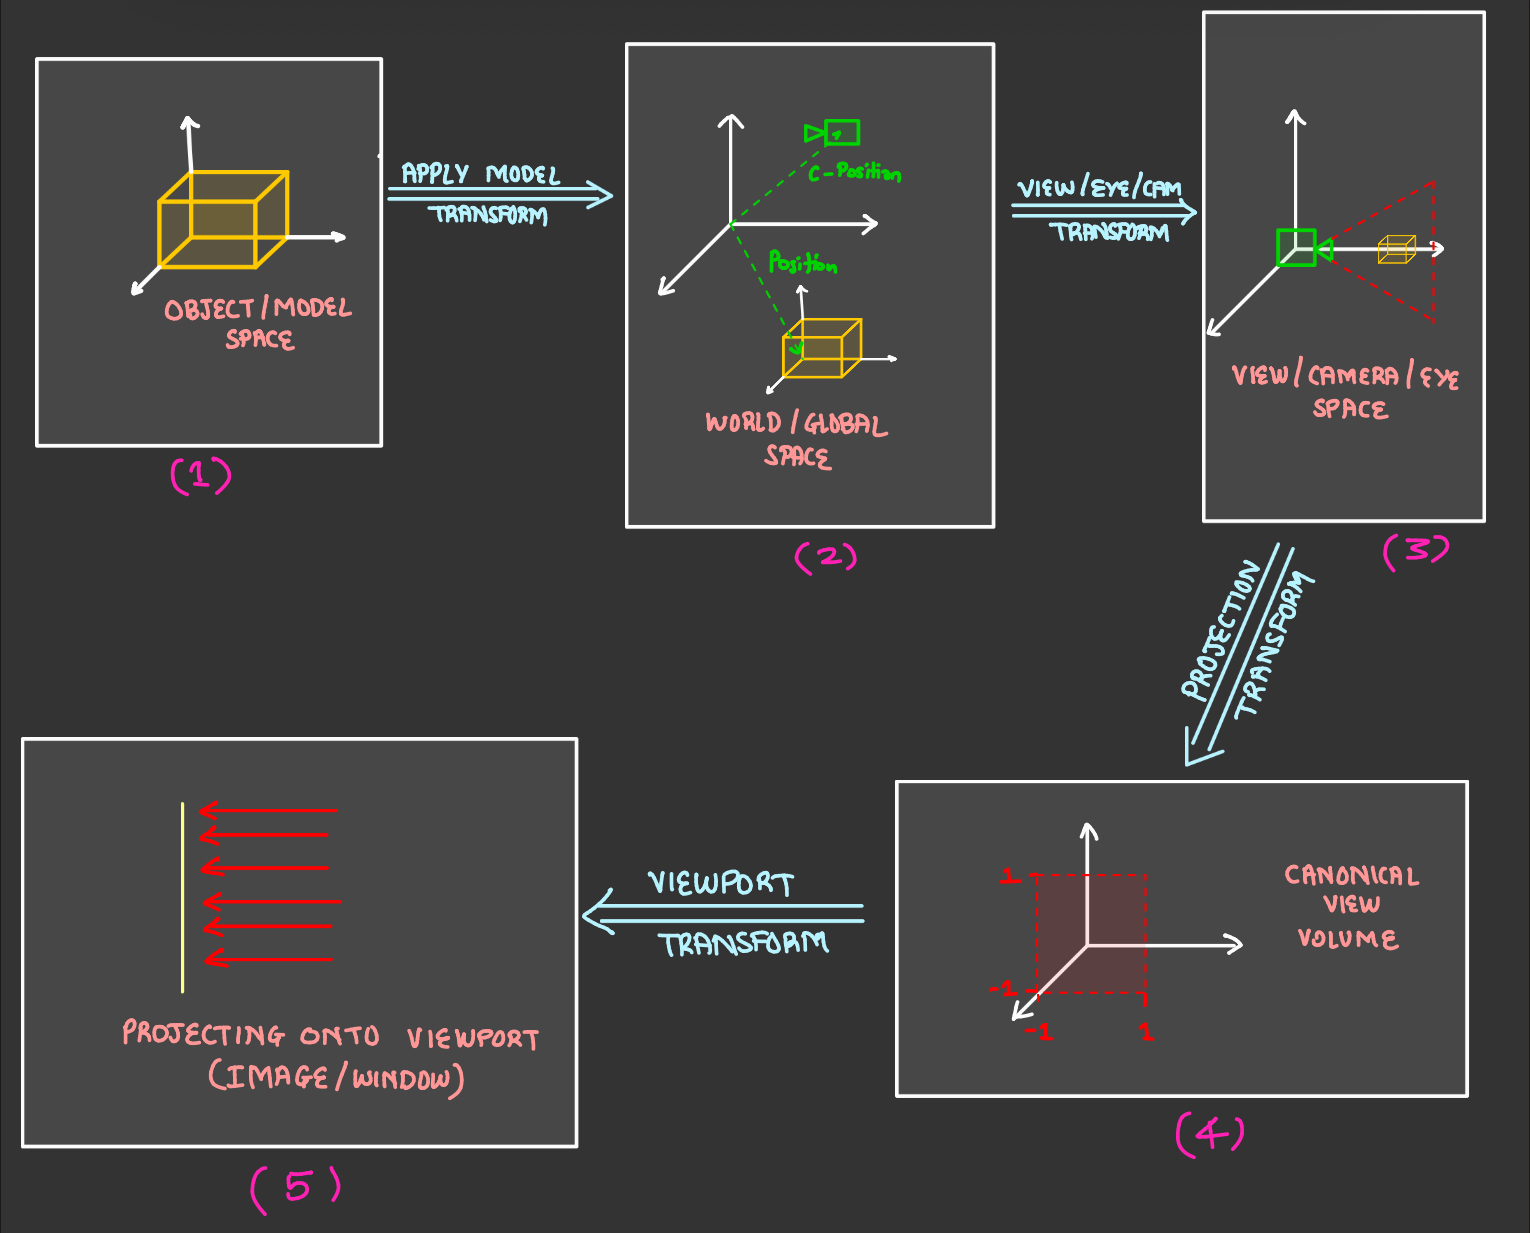
Fig-1.1
"Now isn't that a scary looking transformation pipeling? Lol.. It isn't as scary as it looks. Trust me on this one". To understand this pipeline or series of transformations properly, we divide those into a series of steps. Let's tackle them one-by-one :)
1. Model/Object Space
Any 3D-model you load into your virtual world is what we call as "in the model/object space". All the vertex positions of the model is realtive to it's local origin or coordinate-system/frame. As you can see in Fig-1.1 in the first stage the coordinate frame is attached to a vertex of the cuboid and that is exactly it's local-coordinate-frame.
2. World/Global Space
We apply something known as a model-matrix transform to the vertices in the model/object space to bring them to the global/world-space. This space is the canonical (standard) coordinate frame which is fixed at the world-orign and all the other entities in your virtual game-world are placed relative to this canonical frame of reference. By placing all entities relative to this frame, we mean : "We start measuring the position of object's local-coordinate-frame from the world-orign". As you can see in Fig-1.1 how the virtual-camera and the cuboid(game-object) is placed relative to this global/Object space. And thus, we say that those objects are in the world/global space.
3. View/Eye/Camera Space
We apply something known as the View/Eye/Camera transformation to our little-vertices in the world/global space to bring them to something known as the View/Eye/Camera space. Let's call it View-space so that I don't have to oblique every other alternative name... lol. In this space we transform all other vertices so that they would appear as if they are viewed from the lens of our virtual camera in our virtual world. This ain't so complex, We just compute each vertex position w.r.t the camera position. There are some more details to it as well, but that's a discussion for the next part of this blog series.
4. Canonical View Volume
After we have everything set as seen from the lens of our virtual camera. We apply something known as a projection, which transforms our view-volume of the virtual camera into something known as a Canonical View Volume which is nothing but a standardized format for the view-volume in which:
$$ \begin{array}{l} X \: \in [ \: -1, \: 1 ] \\ Y \: \in [ \: -1, \: 1 ] \\ Z \: \in [ \: -1, \: 1 ] \\ \end{array} $$It's not necessary but it's what everyone in the graphics community agrees to and it's now a standard-convention that we use and the benefit of reducing the view-volume to a smaller canonical view-volume is simple, it reduces the range of values we've to work with and it's more convinient. You might be wondering "What in the hell is this view-volume?" Bear with me, i'm just about to explain this. The view volume is the spaces which your virtual-camera can actuall see, anything outside this volume is clipped, or isn't visible on your screen. Voila! It's that simple ;)
5. Viewport Transform
After everything is down to the canonical-view-volume, we've only a single step remaining, we just project or squeeze this canonical-view-volume onto our viewport(Image/Window/Framebuffer) this maps our 3D canonical-view-volume to our 2D-Rectangle(screen/window) and we finally get the integer-coordinates for our individual pixel to be lit for that particlar vertex. And then our rasterizer figures out that this pixel needs to be coloured and then it runs a fragment-shader for each of these pixels, finally giving color to each of those pixels depending on the constraints specified in the fragment-shader.
NEXT-BLOG: 2. Viewing in graphics - The Orthographic Projection